
Tips on How to Build a Timber Frame Sawmill Shed
A guide on how to create posts and beams as well as assemble them into a timber frame structure
When it comes to making outbuildings, timber framing is a time tested and proven building technique. There's a reason why so many people build their houses in timber frame styles.
It isn't just strong and durable but also looks great, with a classy old world charm that combines modern building techniques with a classical architecture style.
So if you want to use timber framing to build a sawmill shed then here's some tips for your build:
What is timber framing?
Timber framing uses post-and-beam construction to build strong, sturdy structures. This style of building historically originates from Europe, but examples of timber framing have been seen all over the world.
Because timber framing uses large timbers, it typically requires large logs to be milled and processed. Some builders prefer to use green lumber, since the wood will settle and shrink around the joinery as it ages, while others prefer using lighter, dry lumber that won't warp or shift over time.
With the advent of portable sawmills like the HM130MAX, it's made it even easier for individual sawyers to cut down their own trees and do timber framing affordably, leading to a revival of the craft with hobbyist builders.
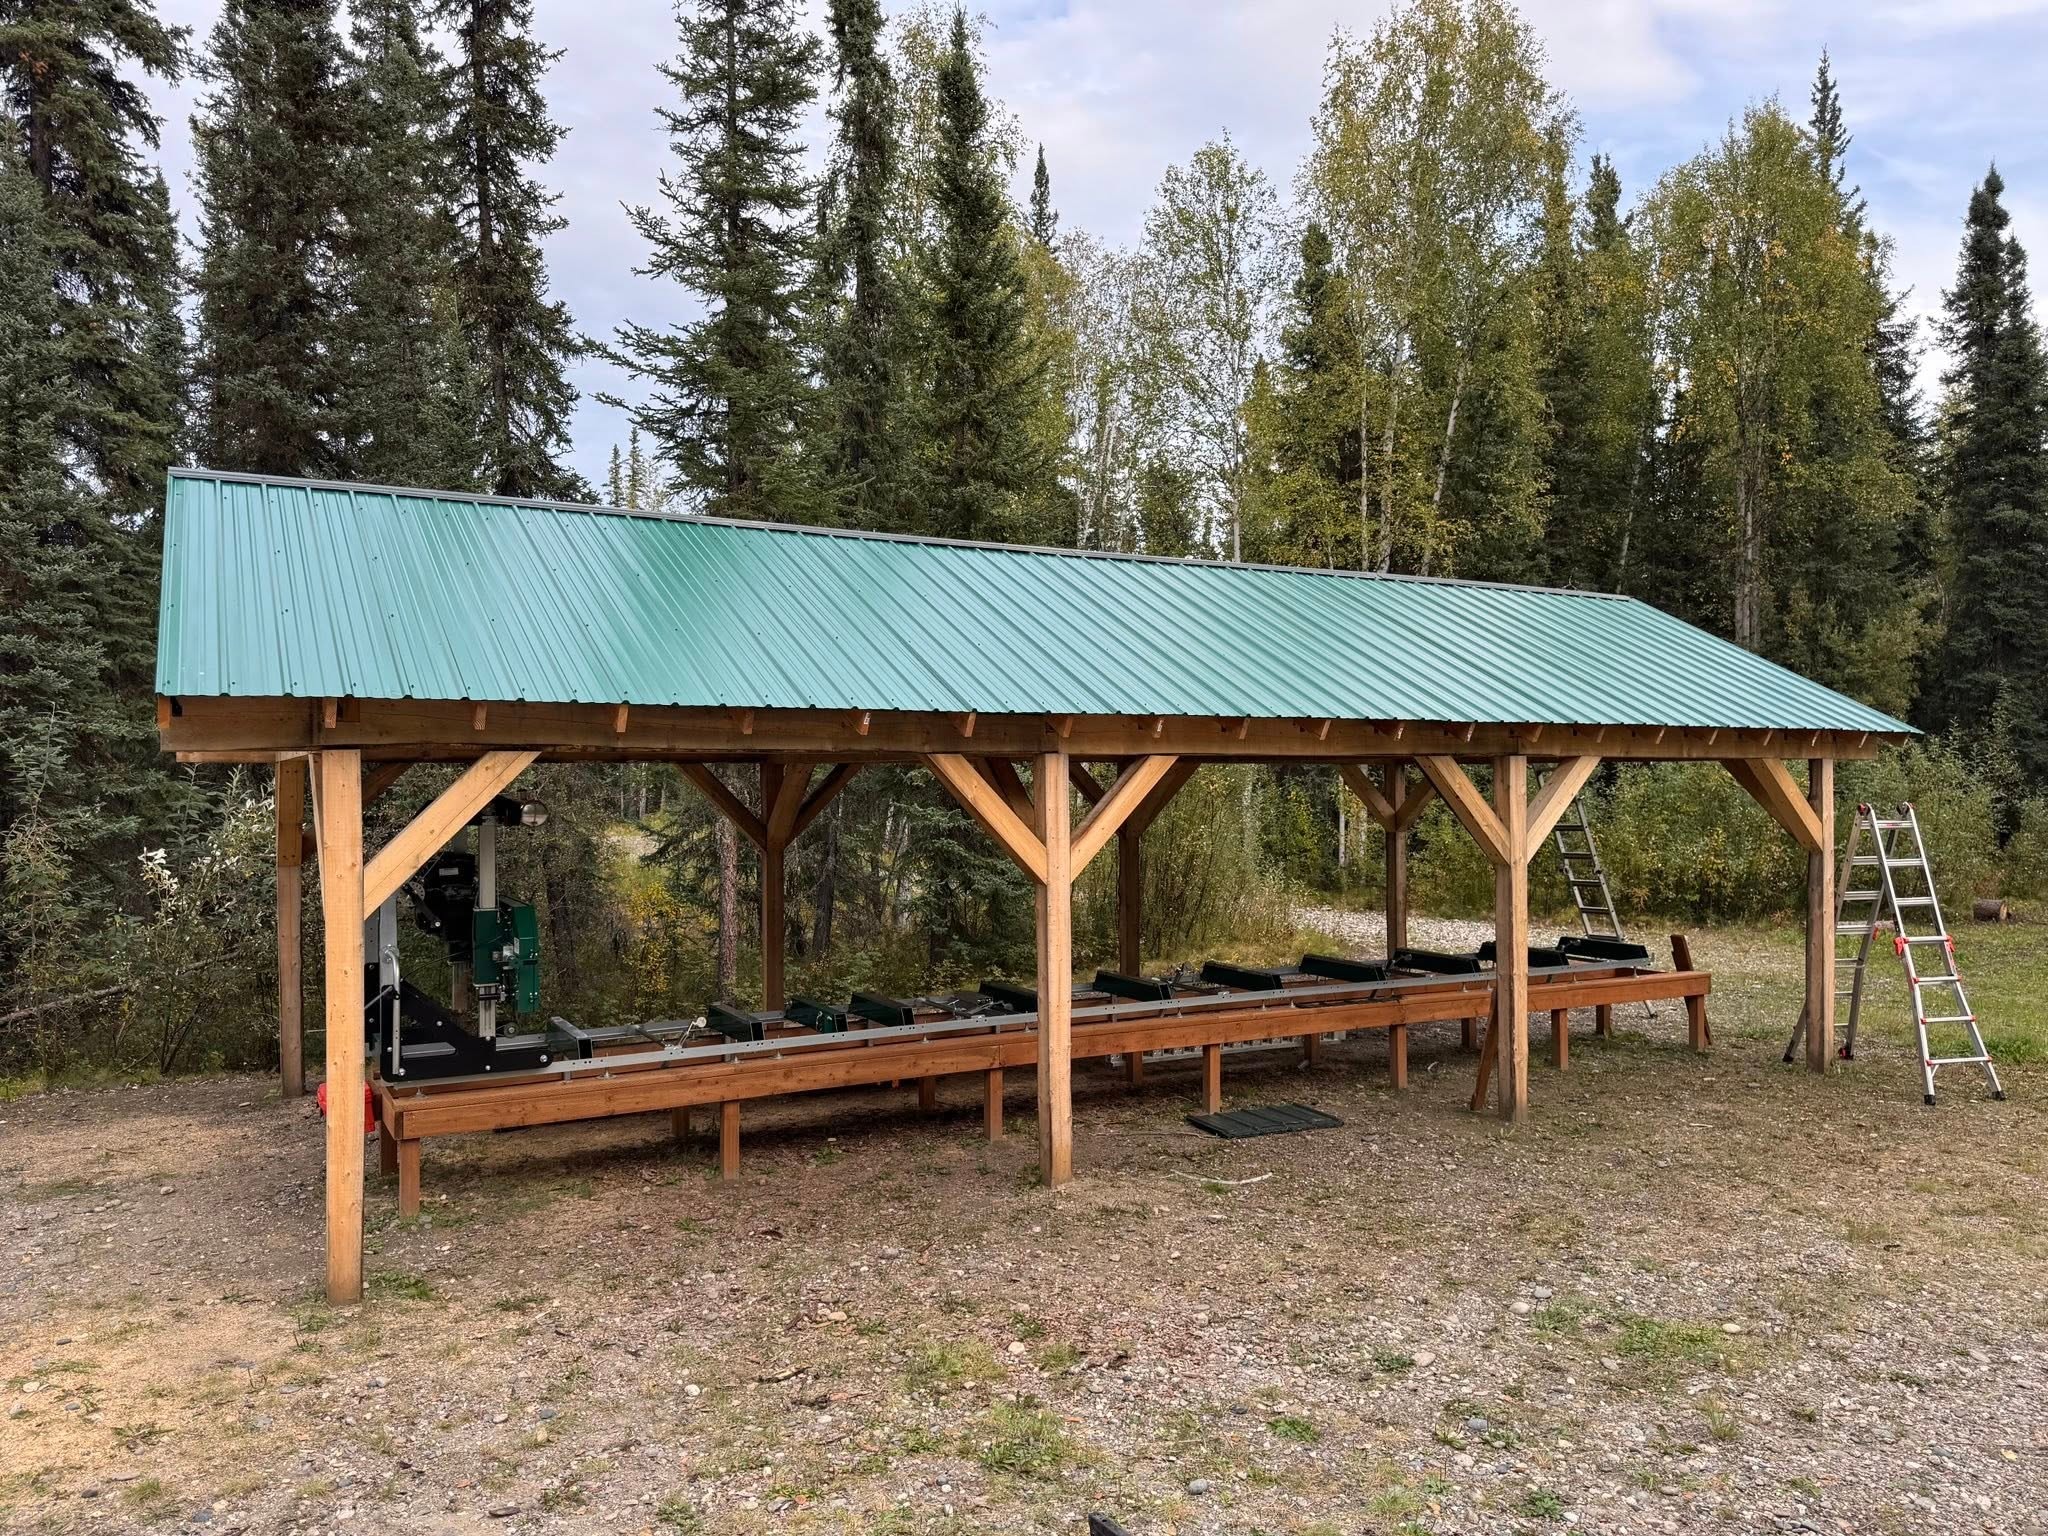
Image courtesy of Buck P. from the Woodland Mills Product Owners and Community Facebook Group.
How is timber framing done?
Timber framing is a process that can take a long time if done manually, especially if you plan on cutting down your own trees and creating your own posts and beams. But the process can also be incredibly rewarding because you're not only making an incredibly strong structure, an investment to the longevity of your project, but you're also ensuring you're using the best lumber and techniques.
A condensed version of the timber framing process from start to finish includes:
-
-
Felling and milling your logs into posts
-
Coming up with a detailed plan for your build
-
Doing the joinery to ensure a sturdy construction
-
Raising your timbers and assembling your structure
-
Some builders like to do exposed timbers, also known as a half-timbered build, while others hide the timber framing behind exterior paneling.
Exposed timber frame shouldn't rot so long as moisture can't be trapped anywhere, but if you want to ensure your build is rot resistant you could fully enclose your structure via weather proofing with exterior sheeting like bricks or wooden paneling.
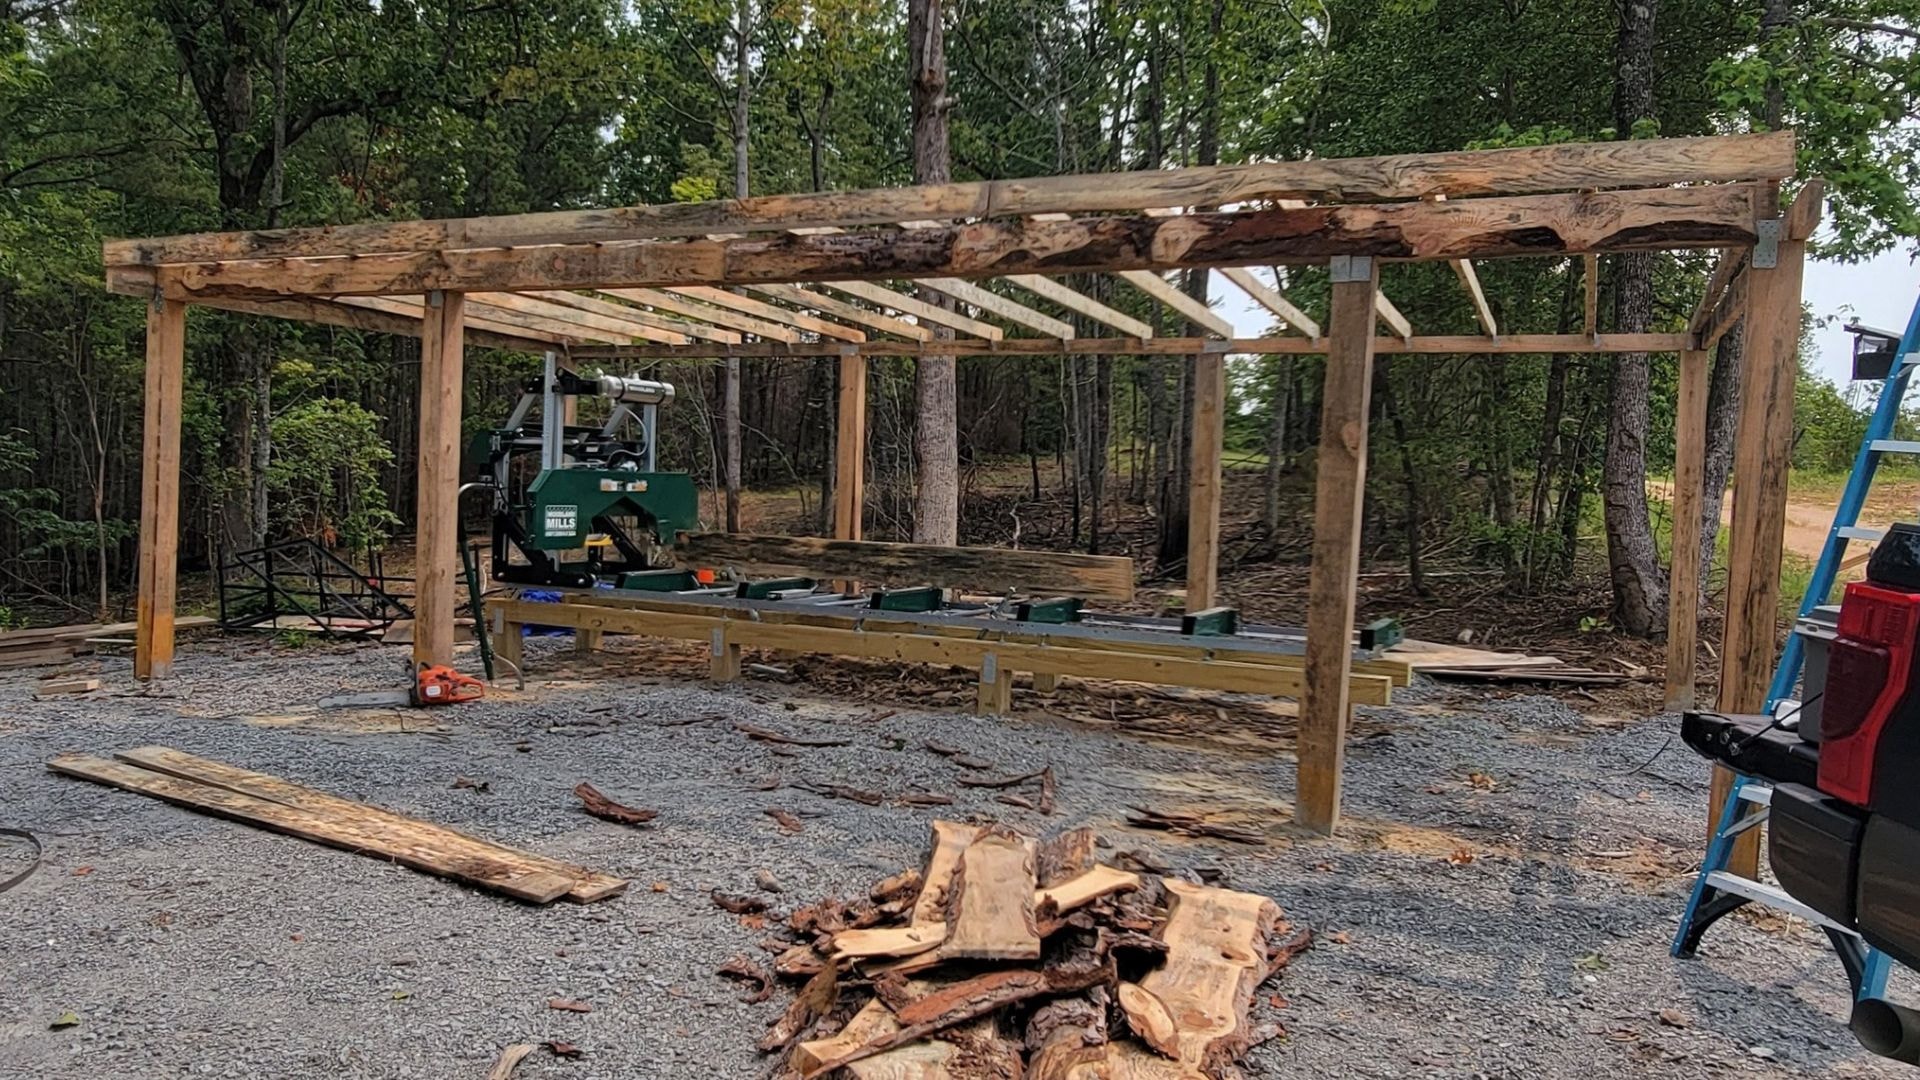
Image courtesy of Marshall S. from the Woodland Mills Product Owners and Community Facebook Group.
Why would I build a timber frame sawmill shed?
Owning a portable sawmill like the HM126 makes creating the timbers required for a timber frame shed very easy, since you can easily mill your logs into cants and raise them right there.
You can also use the sawmill itself to help do your joinery cuts, saving you hours from manually sawing or chiseling the timbers yourself.
Not to mention that it's a great way to demonstrate the utility of your sawmill, while providing a solid roof that will protect your sawmill for years to come.
How do I build a timber frame sawmill shed?
Let's get started with your timber frame build. Once it's complete you'll have a great location to store your sawmill and keep it protected from rain and the elements.
Step 1 - Come up with a plan
The first step and one of the most important is to figure out how your finished product is going to be built.
There are plenty of designs online for simple sawmill sheds that you can easily find. A popular design among sawyers is to do a lean-to structure. That way you can avoid having to do a large span and don't have to worry about additional posts required to bear the weight of your roof. A simple 10' wide shed will give you enough room to place your sawmill, with space on either side to navigate the machine and move your logs.
A lean-to structure also gives you an open side to roll your logs in or drive them in with a forklift.
Ultimately the design is up to you and there are plenty of examples of more complicated sawmill shed designs.
Just do the math first. Look at the size of your timbers and make sure your posts and beams are large enough to support your roof before you start building.
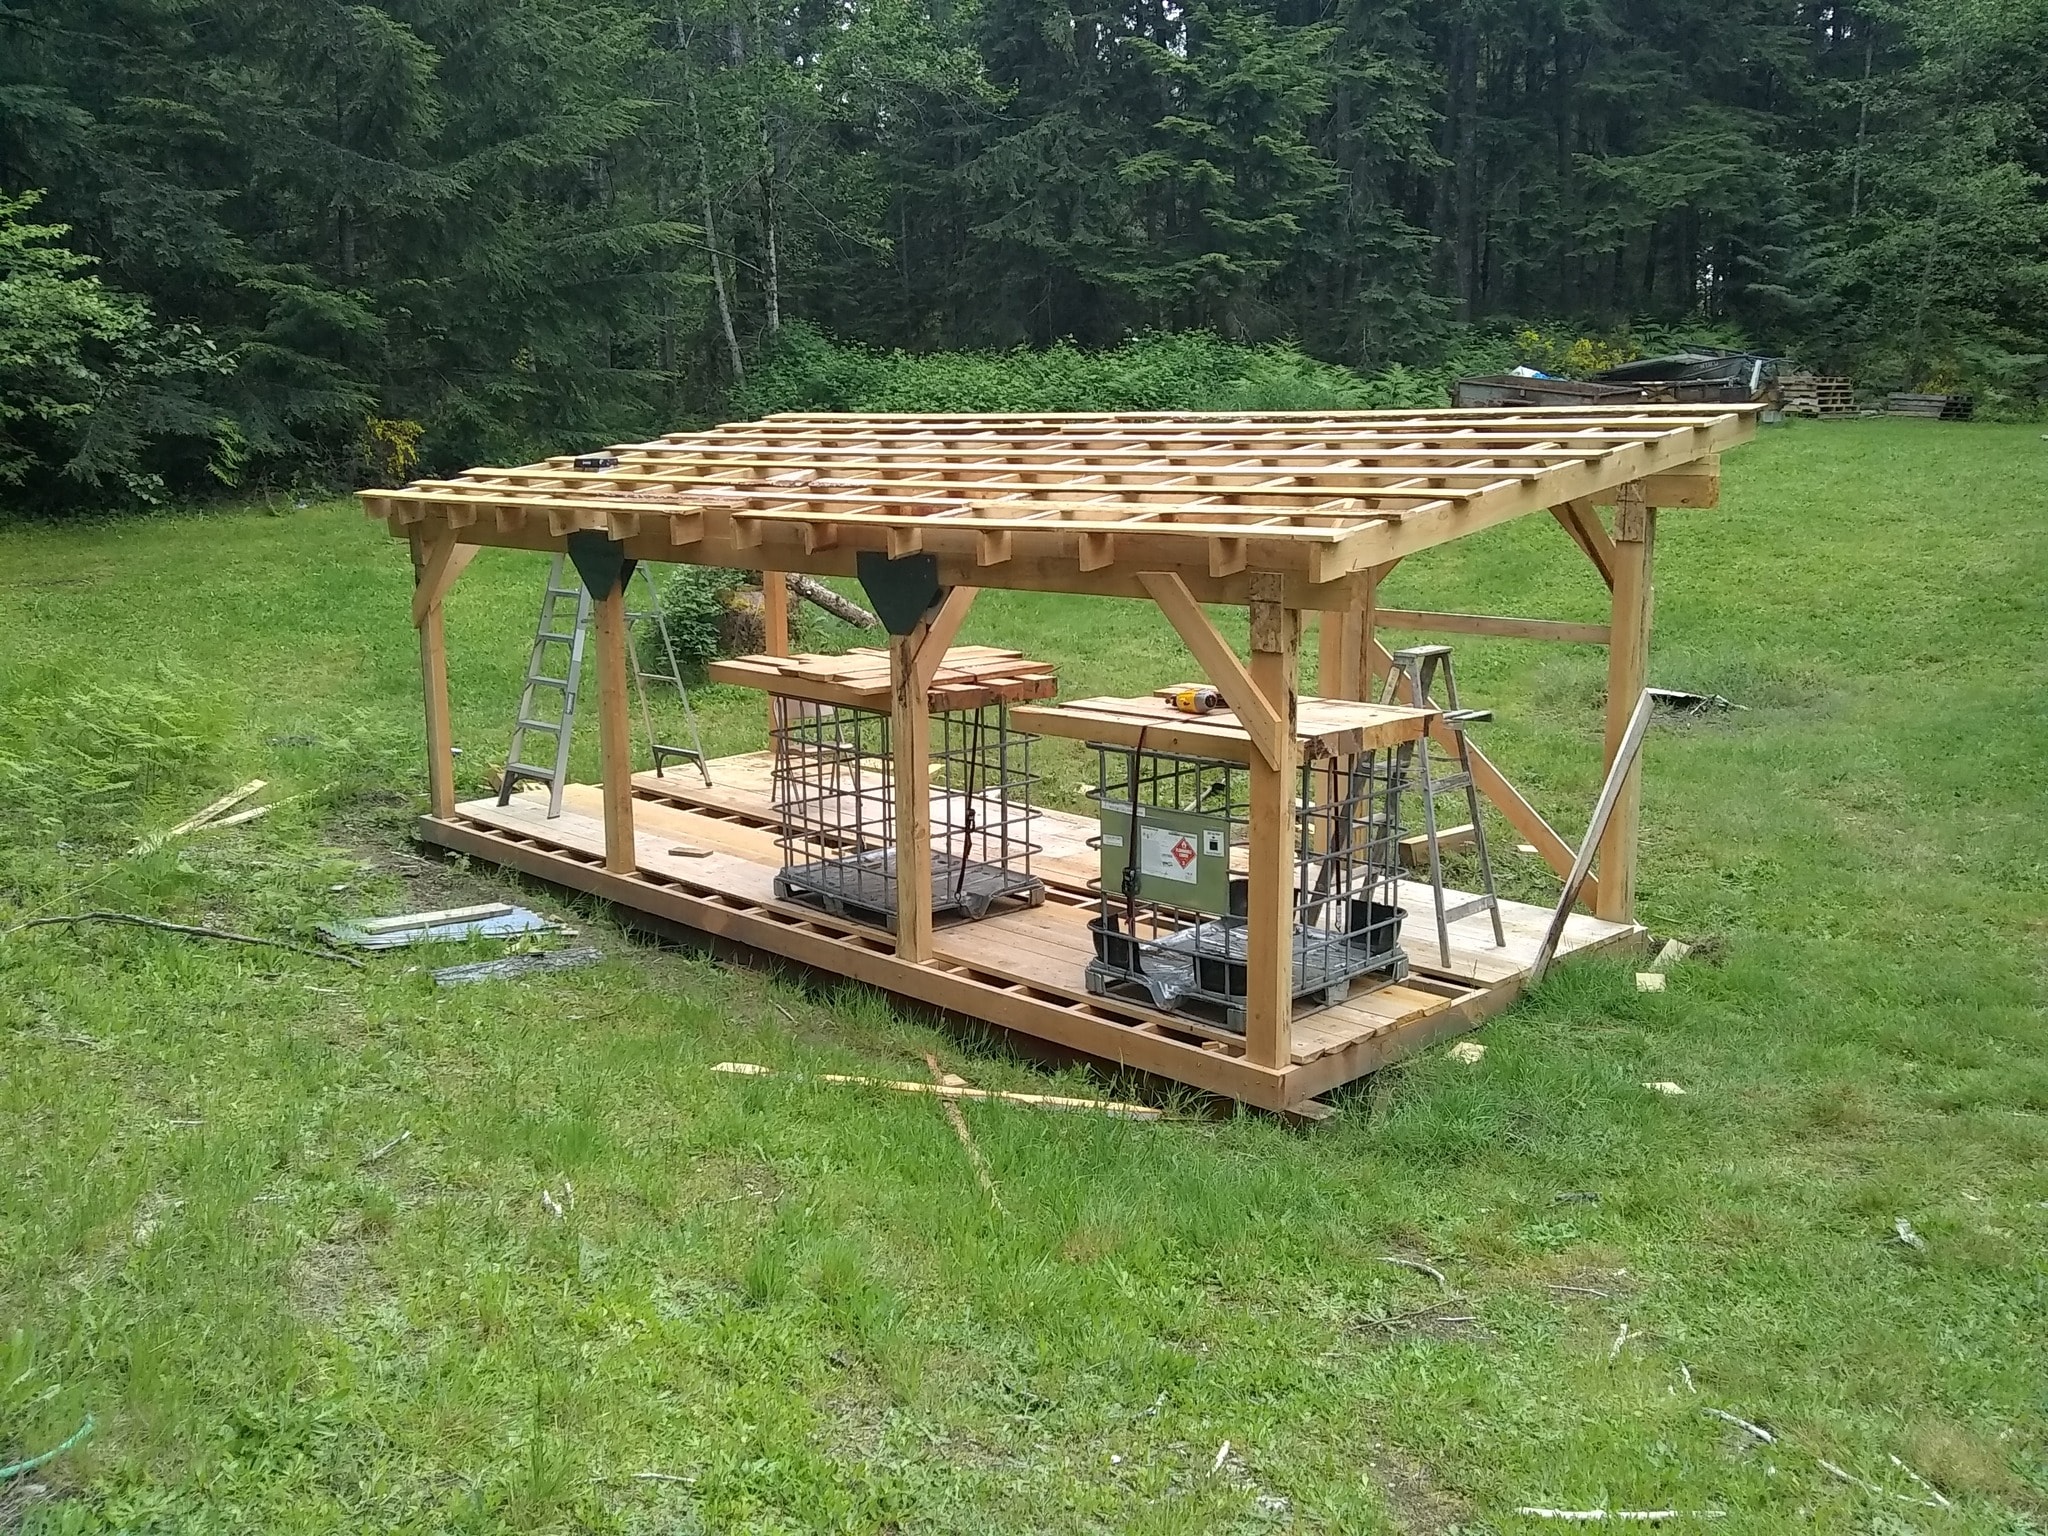
Image courtesy of Wesley S. from the Woodland Mills Product Owners and Community Facebook Group.
Step 2 - Milling your timbers
Using your Woodland Mills portable sawmill you can begin milling your logs into cants. You can leave them as-is until you're ready to cut them down to final size and do the joinery, or if you've planned everything in advance, you can do that step while your cant is on the mill.
The advantage to doing the joinery work as you go is you can make little adjustments and fix mistakes on the fly, whereas if you do everything in advance you're committed to doing it that way, or will have to throw out timbers and mill new ones if you need to correct an issue.
Step 3 - Treating your timbers
This step is going to depend on the plan you've chosen for your structure.
Few sawyers bother with chemically treating their timbers for a sawmill shed. There aren't a lot of places for moisture to get trapped, and as long as the wood has room to breathe then you shouldn't have to deal with rot.
With that said, if you plan on sealing in your wood timbers with board-and-batten or other exterior finishing, then you may want to use a weather-proof membrane so moisture doesn't leak in and get trapped inside the timbers.
The exception to this is your posts which are going underground. You may want to treat these to prevent rot from the trapped moisture of the soil around them.
Step 4 - Raising your timbers
This is the fun part. Depending on the size of your shed you may need help with raising your timbers, so ask friends and family if they would be willing to help. You may need a small crane to help with raising the beams for the roof.
For a simple sawmill shed you should bury your posts a few feet underground and seal them in with concrete. Make sure these posts are straight so the rest of your joinery work fits tightly together.
You could also have your sawmill shed secured to a concrete pad, thus avoiding having to use any type of treated lumber, but you may not have the security of having your structure firmly planted in the ground.
Once you start raising timbers, you'll need to put your posts and beams together. There are a few different styles of timberframe joinery:
-
-
If you're doing it with traditional wooden joinery, then secure your posts and beams in place by hammering in your dowels. The fit should be tight so that as the wood settles it shrinks around the joinery, creating a solid joint.
-
If you don't want to use traditional wood joinery then hardware store brackets will work, just make sure they're designed to bare the weight load they'll be put under.
-
You could also do a dovetail-style cabin, which doesn't use any dowels or brackets for the joinery and instead uses angled cuts at the end of each timber to naturally stack atop each other.
-
Once your timber frame is raised you can begin erecting walls and install the roof.
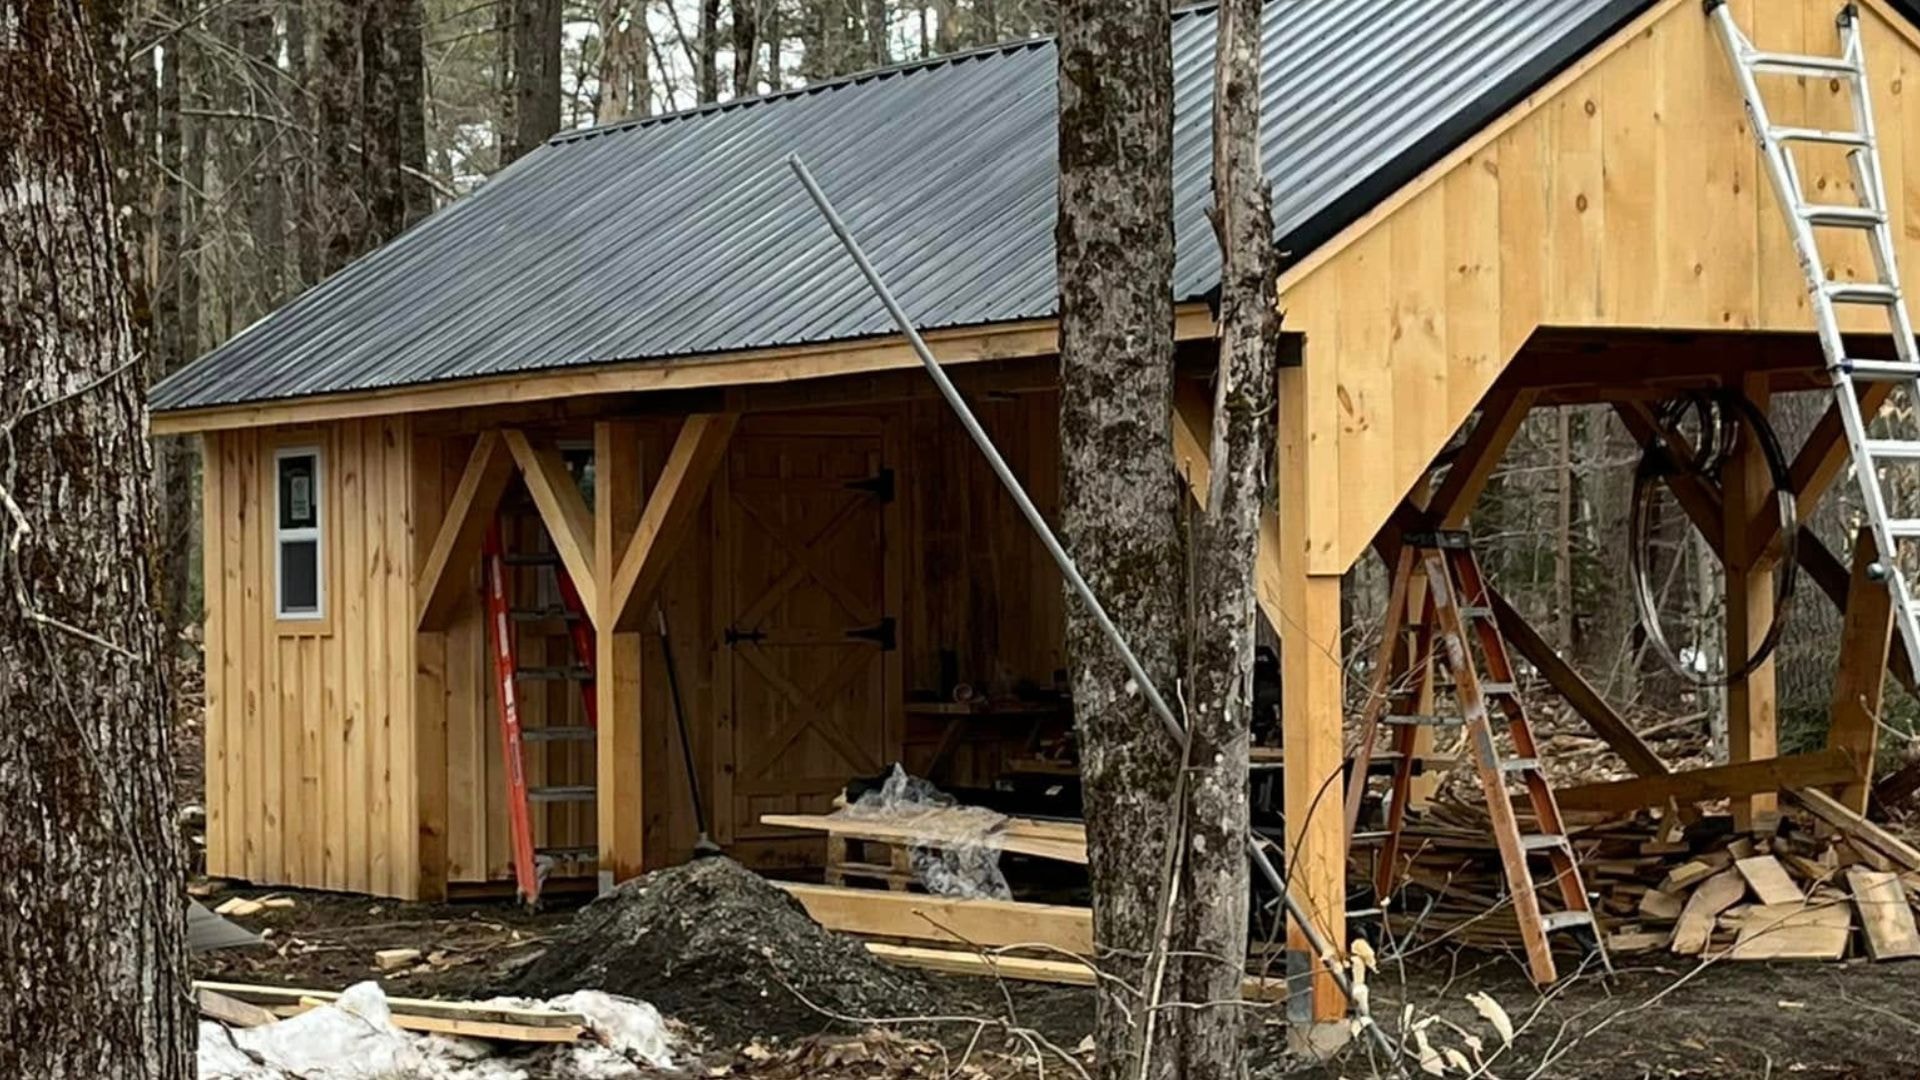
Image courtesy of Steve H. from the Woodland Mills Product Owners and Community Facebook Group.
In conclusion
Timber framing is an easy and reliable way of building yourself a sawmill shed, plus it gives you experience on your sawmill and practice for any future timber frame builds you want to do.
If there are any other timber frame projects out there you want to try, then do a bit of research first before starting. Dan and J from Two Guys Timberframing are a great resource with many knowledgeable videos showing how they make their timber frame village.
Overall though here are the tips you want to remember:
-
-
Make sure your cuts are true and consistent
-
Do your joinery during the assembly process so you can adjust for any differences or mistakes from your plan
-
Ensure there's no places for moisture to get trapped
-
Use your portable sawmill to make complicated joinery cuts easier
-
SHOP SAWMILLS
HM122
An entry-level sawmill packed with impressive features at a budget-friendly price. Designed for hobby sawyers or woodworkers looking for an economical solution to mill lumber.
HM126
One of the best-valued sawmills in the industry. A longstanding favourite that ensures smooth, accurate cuts. Perfect for hobby sawyers, entrepreneurs or seasoned woodworkers.
HM130MAX®
A wide capacity sawmill that produces stunning high-value live-edge boards. Loaded with features including our FULLCUT™ sawhead, RapidChange® blade system, auto lube, and more.
HM136MAX™
The ultimate solution for cutting wide live edge slabs, perfect for tabletops, counters, benches, and more. Our unique FULLCUT™ sawhead design ensures your logs' widest assets are left intact.
Join the Woodland Mills Community Facebook group. Search advice and insights from over 65,000 knowledgeable, supportive members.
- Pre-purchase considerations
- Sawmill set-up support
- Project inspiration photos and videos
- Community troubleshooting support